Firefox OS 上的瀏覽器 APP 利用 Gecko 提供的 Browser API 來管理網頁瀏覽,並利用 HTML5 技術提供使用者界面。根據不同的實作它可以實現分頁,瀏覽歷史,書籤… 等等功能。這篇文章示範如何建立一個可以在 Firefox OS 裝置上使用的瀏覽器 APP,它包含了最基本的網誌列跟上一頁/下一頁功能。
文章範例的原始碼可以在這裡下載:
https://github.com/begeeben/firefox-os-browser-sample
基本工具: WebIDE
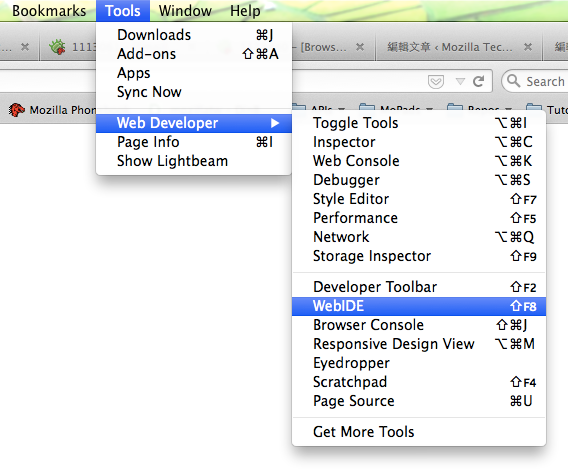
Firefox 34 以及之後的版本都包含了 WebIDE。開發瀏覽器 APP 的並不一定需要一台 Firefox OS 手機,我們可以在 WebIDE 上用 Firefox OS simulator 來執行這個 APP。使用 WebIDE 可以很容易的從範本建立一個 APP,並做 HTML/CSS/JS 編輯。要開啟 WebIDE,從上面的標題列選 Tools > Web Developer > WebIDE :
使用範本建立 APP:
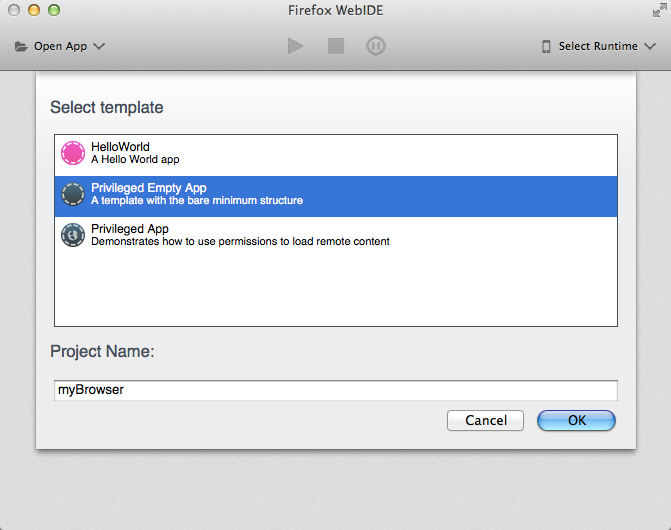
首先,從 WebIDE 的空白範本建立一個 APP。Privileged APP 才能有 browser 權限使用 Browser API,它提供了一些在 Firefox OS 上才能用的 method 和 event 來管理
iframe。
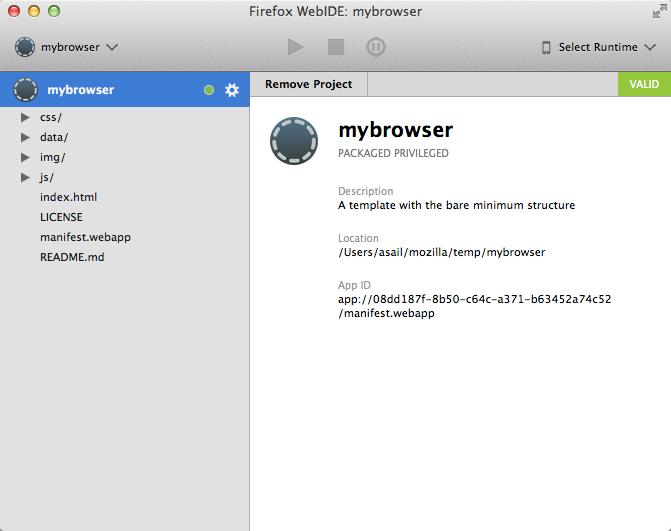
建好的 APP 看起來像下面這張圖,接下來我們要開始寫 code 做瀏覽器 APP 需要的功能。
設定 manifest.webapp:
從範本建立好的 APP 已經在 manifest.webapp 裡設定
type 為
privileged:
"type": "privileged",
1
"type": "privileged",
要使用 Browser API 我們需要加上
browser 權限:
"permissions": {
"browser": {}
},
123
"permissions": { "browser": {} },
HTML 結構:
這個瀏覽器 APP 上面會有一條工具列,畫面中央會拿來放用來瀏覽網頁用的
iframe,之後將用 javascript 來產生這個
iframe。這個 APP 剛開啟的時候預設顯示 “Hello myBrowser!"。
<!-- browser toolbar -->
<div id="toolbar">
<button id="goback-button" type="button" disabled><</button>
<button id="goforward-button" type="button" disabled>></button>
<!-- url bar displays page url or page title -->
<form id="url-bar">
<input id="url-input" type="text"></input>
</form>
<button id="url-button" form="url-bar">GO</button>
</div>
<!-- the container for the browser frame -->
<div id="frame-container" class="empty">
<div id="empty-frame">
<h1>Hello myBrowser!</h1>
</div>
</div>
12345678910111213141516
<!-- browser toolbar --><div id="toolbar"> <button id="goback-button" type="button" disabled><</button> <button id="goforward-button" type="button" disabled>></button> <!-- url bar displays page url or page title --> <form id="url-bar"> <input id="url-input" type="text"></input> </form> <button id="url-button" form="url-bar">GO</button></div><!-- the container for the browser frame --><div id="frame-container" class="empty"> <div id="empty-frame"> <h1>Hello myBrowser!</h1> </div></div>
預設看起來長這樣:

管理瀏覽網頁的 iframe:
要提供 iframe 裡面網頁的資訊到使用者界面上,需要接收處理
mozbrowser event。在
iframe 上加
mozbrowser 參數,就可以在這
iframe 上使用 Browser API。在這裡為了要把 UI 和 mozbrowser 的處理邏輯分開,我們建立一個 tab.js,這樣也預留了未來可以做多分頁瀏覽的彈性。
/**
- Returns an iframe which runs in a child process with Browser API enabled
- and fullscreen is allowed
*
- @param {String} [url] Optional URL
- @return {iframe} An OOP mozbrowser iframe
*/
function createIFrame (url) {
var iframe = document.createElement('iframe');
iframe.setAttribute('mozbrowser', true);
iframe.setAttribute('mozallowfullscreen', true);
iframe.setAttribute('remote', true);
if (url) {
iframe.src = url;
}
return iframe;
}
12345678910111213141516171819
/* Returns an iframe which runs in a child process with Browser API enabled and fullscreen is allowed @param {String} [url] Optional URL @return {iframe} An OOP mozbrowser iframe */function createIFrame (url) { var iframe = document.createElement('iframe'); iframe.setAttribute('mozbrowser', true); iframe.setAttribute('mozallowfullscreen', true); iframe.setAttribute('remote', true); if (url) { iframe.src = url; } return iframe;}
在
iframe 加上
mozallowfullscreen 參數可以允許網頁使用全螢幕。在網頁裡面在要顯示全螢幕的 element 上呼叫
Element.mozRequestFullscreen 。
加了
remote 參數讓
iframe 跑在另一個獨立的 child process 上。這是為了避免惡意的網站直接存取瀏覽器 APP 本身。(目前的 Firefox OS 版本還沒有允許 Nested OOP,因此這個參數在我們的範例還沒有作用,需要等 Bug 1020135 – (nested-oop) [meta] Allow nested oop <iframe mozbrowser>)
Tab object 在建構的時候會建立一個
iframe ,並且開始聽這個
iframe 上的
mozbrowser event。
/**
- The browser tab constructor.
*
- Creates an iframe and attaches mozbrowser events for web browsing.
*
- Implements EventListener Interface.
*
- @param {String} url An optional plaintext URL
*/
function Tab (url) {
this.iframe = createIFrame(url);
this.title = null;
this.url = url;
this.iframe.addEventListener('mozbrowserloadstart', this);
this.iframe.addEventListener('mozbrowserlocationchange', this);
this.iframe.addEventListener('mozbrowsertitlechange', this);
this.iframe.addEventListener('mozbrowserloadend', this);
this.iframe.addEventListener('mozbrowsererror', this);
};
1234567891011121314151617181920
/* The browser tab constructor. Creates an iframe and attaches mozbrowser events for web browsing. Implements EventListener Interface. @param {String} url An optional plaintext URL */function Tab (url) { this.iframe = createIFrame(url); this.title = null; this.url = url; this.iframe.addEventListener('mozbrowserloadstart', this); this.iframe.addEventListener('mozbrowserlocationchange', this); this.iframe.addEventListener('mozbrowsertitlechange', this); this.iframe.addEventListener('mozbrowserloadend', this); this.iframe.addEventListener('mozbrowsererror', this);};
除了這五個 event 以外,這個簡單的 APP 還有很多
mozbrowser event 沒用到。這些 event 提供很多
iframe 有用的資訊,比如說
title ,URL,讀取進度,context menu 等等。
例如,我們可以用
mozbrowsertitlechange event 來收到
iframe 裡面網頁的
title 。在 tab.js 裡面當收到
title 的時候,發出一個
CustomEvent ‘
tab:titlechange’ 通知其他組件更新頁面的 title。
Tab.prototype.mozbrowsertitlechange = function _mozbrowsertitlechange (e) {
if (e.detail) {
this.title = e.detail;
}
var event = new CustomEvent('tab:titlechange', { detail: this });
window.dispatchEvent(event);
};
12345678
Tab.prototype.mozbrowsertitlechange = function _mozbrowsertitlechange (e) { if (e.detail) { this.title = e.detail; } var event = new CustomEvent('tab:titlechange', { detail: this }); window.dispatchEvent(event);};
這裡示範在 ‘
tab:titlechange ‘ event 的時候更新網頁
title。如果要做分頁總覽功能,也要用一樣的方式更新各個頁面的
title。
/**
- Display the title of the currentTab on titlechange event.
*/
window.addEventListener('tab:titlechange', function (e) {
if (currentTab === e.detail) {
urlInput.value = currentTab.title;
}
});
12345678
/* Display the title of the currentTab on titlechange event. */window.addEventListener('tab:titlechange', function (e) { if (currentTab === e.detail) { urlInput.value = currentTab.title; }});
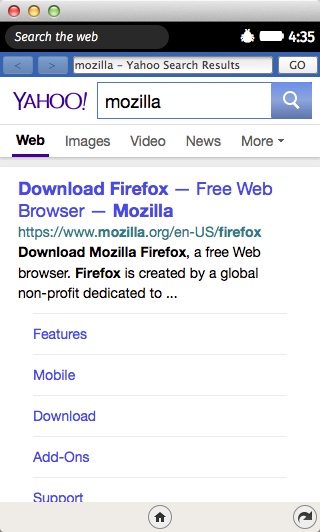
在使用者送出 input 的時候瀏覽網頁:
在網址列裡面直接打搜尋條件很普遍而且很方便。當使用者送出 URL 的時候,先判斷這是不是一個有效的 URL,如果不是,就當做搜尋條件,使用搜尋引擎 URI 來搜尋。
/**
- The default search engine URI
*
- @type {String}
*/
var searchEngineUri = 'https://search.yahoo.com/search?p={searchTerms}';
/**
- Using an input element to check the validity of the input URL. If the input
- is not valid, returns a search URL.
*
- @param {String} input A plaintext URL or search terms
- @param {String} searchEngineUri The search engine to be used
- @return {String} A valid URL
*/
function getUrlFromInput(input, searchEngineUri) {
var urlValidate = document.createElement('input');
urlValidate.setAttribute('type', 'url');
urlValidate.setAttribute('value', input);
if (!urlValidate.validity.valid) {
var uri = searchEngineUri.replace('{searchTerms}', input);
return uri;
}
return input;
}
123456789101112131415161718192021222324252627
/* The default search engine URI @type {String} /var searchEngineUri = 'https://search.yahoo.com/search?p={searchTerms}'; / Using an input element to check the validity of the input URL. If the input is not valid, returns a search URL. @param {String} input A plaintext URL or search terms @param {String} searchEngineUri The search engine to be used @return {String} A valid URL /function getUrlFromInput(input, searchEngineUri) { var urlValidate = document.createElement('input'); urlValidate.setAttribute('type', 'url'); urlValidate.setAttribute('value', input); if (!urlValidate.validity.valid) { var uri = searchEngineUri.replace('{searchTerms}', input); return uri; } return input;}
接下來確認有沒有 Tab object,沒有的話就新建一個,把 URL 傳給 Tab 並設定成
iframe 的
src 。
/**
- Check the input and browse the address with a Tab object on url submit.
*/
window.addEventListener('submit', function (e) {
e.preventDefault();
if (!currentUrlInput.trim()) {
return;
}
if (frameContainer.classList.contains('empty')) {
frameContainer.classList.remove('empty');
}
var url = getUrlFromInput(currentUrlInput.trim(), searchEngineUri);
if (!currentTab) {
currentTab = new Tab(url);
frameContainer.appendChild(currentTab.iframe);
} else if (currentUrlInput === currentTab.title) {
currentTab.reload();
} else {
currentTab.goToUrl(url);
}
});
12345678910111213141516171819202122232425
/* Check the input and browse the address with a Tab object on url submit. */window.addEventListener('submit', function (e) { e.preventDefault(); if (!currentUrlInput.trim()) { return; } if (frameContainer.classList.contains('empty')) { frameContainer.classList.remove('empty'); } var url = getUrlFromInput(currentUrlInput.trim(), searchEngineUri); if (!currentTab) { currentTab = new Tab(url); frameContainer.appendChild(currentTab.iframe); } else if (currentUrlInput === currentTab.title) { currentTab.reload(); } else { currentTab.goToUrl(url); }});
currentTab.reload 裡面用了
iframe.reload 這個 Browser API 來重新讀取頁面。
/**
- Reload the current page.
*/
Tab.prototype.reload = function _reload () {
this.iframe.reload();
};
123456
/* Reload the current page. */Tab.prototype.reload = function _reload () { this.iframe.reload();};
開啟或關閉上一頁或下一頁按鈕:
最後要用 Browser API 檢查網頁能不能回上一頁或到下一頁。
iframe.getCanGoBack 會回傳一個
DOMRequest,在
onsuccess callback 裡面我們可以知道檢查的結果。這邊用 Promise 包起來讓他比較方便存取。
/**
- Check if the iframe can go backward in the navigation history.
*
- @return {Promise} Resolve with true if it can go backward.
*/
Tab.prototype.getCanGoBack = function _getCanGoBack () {
var self = this;
return new Promise(function (resolve, reject) {
var request = self.iframe.getCanGoBack();
request.onsuccess = function () {
if (this.result) {
resolve(true);
} else {
resolve(false);
}
};
});
};
1234567891011121314151617181920
/* Check if the iframe can go backward in the navigation history. @return {Promise} Resolve with true if it can go backward. */Tab.prototype.getCanGoBack = function _getCanGoBack () { var self = this; return new Promise(function (resolve, reject) { var request = self.iframe.getCanGoBack(); request.onsuccess = function () { if (this.result) { resolve(true); } else { resolve(false); } }; });};
在網頁讀取完以後檢查能不能回上一頁,也就是當
mozbrowserloadend event 發生的時候。
/**
- Enable/disable goback and goforward buttons accordingly when the
- currentTab is loaded.
*/
window.addEventListener('tab:loadend', function (e) {
if (currentTab === e.detail) {
currentTab.getCanGoBack().then(function(canGoBack) {
gobackButton.disabled = !canGoBack;
});
currentTab.getCanGoForward().then(function(canGoForward) {
goforwardButton.disabled = !canGoForward;
});
}
});
123456789101112131415
/* Enable/disable goback and goforward buttons accordingly when the currentTab is loaded. /window.addEventListener('tab:loadend', function (e) { if (currentTab === e.detail) { currentTab.getCanGoBack().then(function(canGoBack) { gobackButton.disabled = !canGoBack; }); currentTab.getCanGoForward().then(function(canGoForward) { goforwardButton.disabled = !canGoForward; }); }});
執行 APP:
手邊可能沒有 Firefox OS 手機能用,不過你還是可以在 WebIDE 裡面用 Firefox OS simulator 來跑 APP:
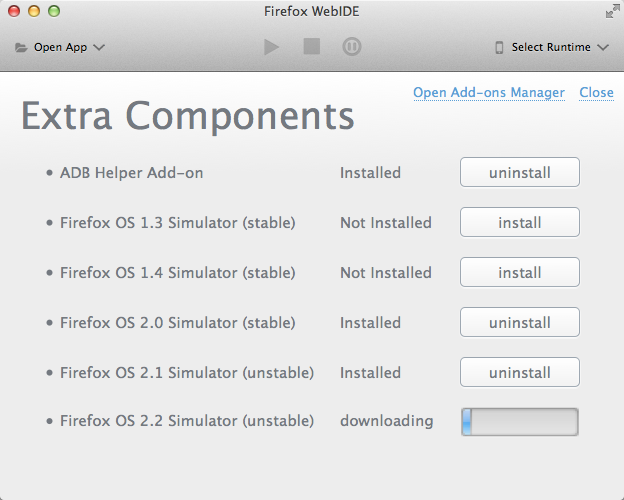
按右上方的 Select Runtime 選一個版本:
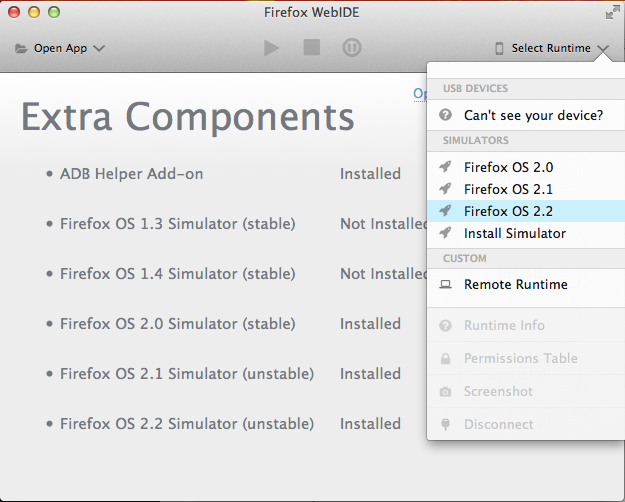
當 Firefox OS 跑起來後,按上面中間的那些按鈕,你就可以執行和 debug 這個 APP。現在你有了一個新的 Firefox OS 瀏覽器 APP!
結語:
要讓這個簡單的瀏覽器 APP 好用還缺很多功能,比如說書籤,設定,搜尋建議,分享… 等。你將會需要 HTML storage 和
mozActivity 來實現這些功能。歡迎實現你的點子,然後分享到 Firefox OS 的 Marketplace 上!
參考閱讀:
https://hacks.mozilla.org/2014/08/building-the-firefox-browser-for-firefox-os/
https://developer.mozilla.org/en-US/docs/Web/API/Using_the_Browser_API